Thursday, April 28, 2011

Counterfeit Kit Blog Hop: Ready For My Close-Up

Hello!  If you found your way to my blog through the Counterfeit Kit Challenge Blog Hop, welcome!  If this is your first time here, I hope you'll take a few minutes to check out some of my other posts. If you're one of my regulars and want to follow along with the entire hop, you can begin at the Counterfeit Kit Challenge site.

I've been following the Counterfeit Kit Challenge for a while now, but this is the first month I actually made a kit and actively participated.  You can see the "original" kit here, and my "counterfeit" kit here.

For this Design Team Inspiration Challenge, we were asked to visit the Design Team's blogs and be inspired in some way to create a project using our own kit. There were so many great projects to choose from, but I ultimately was inspired by this layout by Jemma aka JimJams


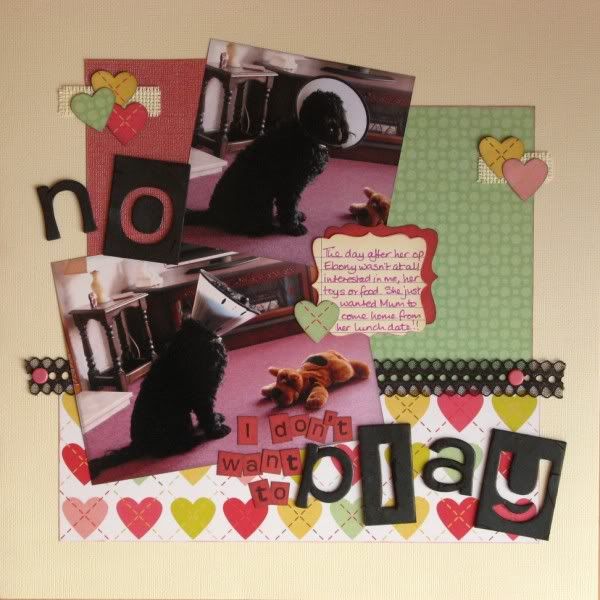
I think I was drawn in by the cute doggie pictures as well as the overall design.  I ended up doing a pretty straightforward scraplift of her design, even using my own "cute doggie" picture!


The sweetie-pie in the picture is my four-year-old Chocolate Lab, Melody, who is a very willing model! I kept the layout fairly simple, choosing to layer lots of patterned paper, and go easy on the embellishments.  Those little acrylic flowers are by Webster's Pages, and I love them, so sweet and tiny! They were a recent purchase, but everything else had been in my stash for a few months to a few years!


My page uses patterned paper from three different manufacturers (Echo Park, Bo Bunny, and Scenic Route) which is quite a departure from my usual one-coordinated-line per page style, but I'm happy with the result. Definitely need to do this more often!

Thanks for stopping by!  Your next stop on the hop is Julie Ann. Enjoy!

Monday, April 25, 2011

All About Us layouts

Hello! Hope that all of you who celebrate had a lovely Easter. My husband and I enjoyed a nice day at home with my parents. A few things I learned:
  • It's worth the 40 minute drive to the Polish Market in New Britain. Their Easter ham was delicious, and I'm sure the kielbasa and pierogis will be too!
  • I am a good cupcake baker. Good cupcaker decorater? Not so much! My first attempt with frosting and a pastry bag left a lot to be desired!
  • Just like a little kid, I still enjoy showing my parents my latest crafy work. Had fun showing off my pysanky egg and explaining how I made it.
Here are some recent additions to my All About Us albums.  I have one album devoted to layouts about myself, my husband, and the two of us together. This used to include pet pages too, but they now have an album all to themselves.


I made both of these at last weekend's crop, and used the January sketch from Shimelle's 4x6 Photo Love class for both of them. I think this was the first time I used the same sketch for two layouts in one sitting, but I love how it showcased just one 4x6 photo.

Thanks for stopping by!

Saturday, April 23, 2011

"Things we do" layouts and a quick poll!

Hello! Thanks to all of you who left me such nice comments about by Counterfeit Kit projects.  I hope you'll come back on Thursday the 28th to see what I create as part of their blog hop! This will be the first blog hop I've participated in and I am definitely looking forward to it!

I'm taking advantage of the long weekend to play around on my blog. I'm taking Shimelle's Beyond Blogging for Scrapbookers, so expect to see some tweaks to my blog design over the next few weeks. I happy to report that I successfully learned how to add a background design!  What do you think of the new look?

It's a dreary morning here, so I've been playing on the computer, editing some recent layouts in PSE. I have a lot I want to share, so I thought I would spread them out over several posts and group them based on the album they ended up in.  I follow Stacy Julian's Library of Memories/Photo Freedom system for organizing my photos and layouts, and I stick pretty closely to her four main categories: All About Us, People We Love, Places We Go, and Things We Do. If you're interested in her approach, she will be offering a revamped version of her Library of Memories Class over at Big Picture Classes this summer (it will now be called Finding Photo Freedom).  This will be my third and final time taking the class (the original class I took in 2009 included two free sessions as an alum) and I really looking forward to re-connecting with the other LOM alums and meeting new classmates. I will be on break from the college where I teach, so I should have lots of time to play and tweak my system!

Here are the layouts that I recently added to my "Things We Do" albums (divided into Everyday Life, Celebrations, and Traditions & Treasures). Please click on any of the images to zoom in.

Basic Grey paper, brads, and letter stickers.

Journaling close-up

Bo Bunny paper & stickers

More Bo Bunny paper

Fancy Pants paper

Journaling close up

Even more Bo Bunny paper

Journaling Close-up

I'm curious about your own organization systems...can you spare a minute and take this quick poll?


How do you organize your completed layouts?Market Research


Thanks for stopping by!

Sunday, April 17, 2011

Counterfeit Kit Challenge: Two layouts and a card

I've been enjoying playing with the kit I put together as part of the counterfeit kit challenge.  Here's what I created using the kit this past week:

This one was based on the February sketch from Shimelle's 4x6 Photo Love class.

This was for a challenge on another board to be inspired by this layout on the American Crafts blog. I loved the design of the orginal layout, so I did a pretty straightforward scraplift.

And finally this was based on a card by Kristina Werner.  I love her designs, and her steady stream of how-to videos!

Thanks for stopping by!

Saturday, April 9, 2011

Counterfeit Kit Challenge

I've been following the Counterfeit Kit Challenge blog since it started back in January, but I have yet to participate...until now! This month I actually got around to creating a kit!  The "inspiration kit" for this month is A Little Birdie Told Me by Front Porch Kits.  I loved their paper selection, and I did have some "For the Record" papers by Echo Park in my own stash. I used those, and added some other papers by Bo Bunny and Scenic Route.

I was able to match the card stock colors pretty closely. I also included a For the Record sticker sheet and Journaling Cards, Sticky Back Canvas (to replace the burlap in the original kit), Cosmo Cricket chipboard letters, and Basic Grey & My Mind's Eye transparencies.


For the embellishments, I pulled out a lot of bare chipboard (flowers, birds, trees, etc.); ribbon in pinks, yellow, and cream; assorted paper and silk flowers; journaling cards; a fabric handkerchief; and random homemade butterfly and pinwheel accents I had in my stash.


I'm happy with the results! Time to start scrapbooking!

Friday, April 8, 2011

Crafts Night: Pysanky Easter Eggs

Every other month I get together with some friends from my local Newcomers Club for a night of crafting.  Sometimes we just bring whatever current project we are working on, other times we all work on the same project.  Over the past two years we have tried scrapbooking, card making, home decor, jewelry making, and knitting. This week we decided to try our hand at Pysanky (Ukranian) Easter Eggs.  One of our group members has been making these every year for the past 5 years or so, so she had all the necessary supplies, and was able to instruct the rest of us.  

These are the ones my friend has made over the years.
Basically, you create a design on your egg using beeswax and a stylus, then put the egg in a light colored dye bath.  


K. is quite the artist!
She spent a long time putting very intricate designs on her egg.
The parts of the egg covered in wax will remain white.  After coming out of the dye, you add more wax designs, then put it in another color dye. You can repeat this process as much as you want, progressing from light to dark colors. 

Once you are finished, put the egg in a 200 degree oven for a few minutes to soften the wax, and wipe it off.


You end up with a beautiful multi-colored egg!  Here are the finished products:


Mine's the bright red one in the back.
I "egg-lifted" one of my friend's designs!


It was actually a lot easier that I thought it would be, but does require quite a bit of special equipment.  I would love to try it again though, now that I have a better sense of what I am doing!

Thursday, April 7, 2011

Scrapbooking the dogs

Here are a few layouts I made  at a crop back in February that I never got around to posting. I think I completed about ~10 layouts all together; these are the ones featuring our dogs, Melody and Radar.

BoBunny papers

Radar, sucking up to my parents.
This is how we convince them to dog-sit on a regular basis!
Scenic Route paper


Thanks for stopping by!

Tuesday, April 5, 2011

Using the L Letterpress

A few months ago, my local scrapbook store demonstrated the L Letterpress from Lifestyle Crafts. I had seen the tool at Michaels & AC Moore, but never really considered buying it.  It just looked too complicated (and expensive)! But of course, at the demo, they made it look so easy!  Between that, and the good sale they were offering on the starter kit, most of us in attendance went ahead and ordered one (we are dedicated customers and want to keep our LSS in business, after all!).

A month later it arrived.
I brought it home.
It sat in its box. Untouched. For a long time.

A short while later, the store offered a class on how to use the Letterpress.  Again they made it look easy.

I went home, and still it sat in its box!

This past weekend when I was at the store (can you tell I spend a lot of time there??) several of us mentioned that we still hadn't used it, so I finally decided to give it a whirl when I got home.

I should have taken pictures as I went along, but here is a picture of my final product.


I kept it pretty simple the first time out.  I letter-pressed the the branches and the sentiment on the paper that came with the starter kit.  After it dried, I adhered it to some red card stock that I dry embossed with the polka dot pattern, and then adhered that to a plain white card and rounded the corners.

Some things I learned:

  • Setting up the plates is the trickiest part.  You have to put the plates on a double-sided adhesive sheet, cut them out, remove the backing, and adhere to the printing press.This will probably go quicker now that I have the hang of it.  I also found it tricky to line up the plates at first, to create just the right design, but I was able to remove them and rearrange, and the adhesive still worked.
  • You really don't need a lot of ink.  I used a pea-sized amount, and made four cards. I probably could have made more!
  • This is best for assembly-line card making. Once you go to all the trouble of putting the adhesive on the plates, lining them up just so, inking up the brayer, you might as well make a lot of cards!  Would be perfect for a card swap or holiday cards where you want to make a lot of the same design.
  • It takes a long time to dry! Be prepared to wait a while before you adhere your letter-pressed image to the card.
  • I wish the adhesive sheets were smaller...I only needed a third of a sheet for the plates I used.  I put the protective backing back on the remainder of the sheet...I'll let you know if it's still good the next time I pull it out.
  • It works with the Sizzix Big Shot.  No need to go out and buy the Epic 6 if you already have the Big Shot.
Have any of you ever used the Letterpress?  Any tips for me? I am determined not to let it gather dust any more! 

Saturday, April 2, 2011

Saturday Shopping

This morning I paid a visit to my local scrapbook store, The Papercraft Clubhouse, in Westbrook, CT.  Love that place!  I can blame them for my serious scrapping addiction...great classes, great crops, great products!

Today was their monthly Diecuts Club meeting...for a small annual fee you get to attend a monthly meeting with a card make & take, and you get a discount on any dies you purchase.  I love my QuickKutz Revolution and my Sizzix Big Shot, so this is a great deal for me.

Here is the card we made today, designed by the store's owner, Tracie:


And here is what was in my shopping bag when I left the store:

A cute new 6x6 paper pad from Jillbean Soup.Love the bright, summery colors!  Can't wait to make some cards with it.

http://www.jillibean-soup.com/site/images/MiniPadsBlossomSoup.jpg

Some new patterned paper and sticker sheets from Crate Paper:
http://www.cratepaper.com/i//BPStickers_portrait_1.jpg
Liked it so much, I had to get the 6x6 pad too!  I love that so many manufacturers are now making these reduced pattern 6x6 pads.

http://www.cratepaper.com/i//6x6PadNeighborhood.jpg
I had ordered this die at our last meeting...glad to see it had arrived!

loop-de-loo
http://lifestylecrafts.com/media/catalog/product/cache/1/image/9df78eab33525d08d6e5fb8d27136e95/D/C/DC0064.gif
Not too much damage to my wallet, but enough new goodies to keep me busy in my scrap room this weekend!